|
Dedicated
to the Art
and
Artists
of Relief Printmaking
15685
SW 116th Avenue
PMB 202
King City, OR 97224-2695
Phone:
503-641-3555
FAX:
503-641-3591
Orders:
800-832-4264
imcclains.com
Go to McClain's On-line Catalog
Request a catalog
[
Cancel Subscription ]
|
August, 2005
This month, we highlight our customers' work from our Online and Catalog Galleries. This unique collection is made up of woodblock prints, linocuts, engravings, Solarplate images and monotypes or monoprints, all created and submitted by McClain's customers. The galleries offer customers an international forum to display their work plus contact information online and in print. Not only do artists and instructors cite the work for inspiration and demonstrations, but collectors have been known to browse in search of new prints! All submissions are printed annually in our catalog and then posted online on our website. It's our way of saying "thank you" to our great customers. It's always a nice surprise to see the variety of work created with the supplies that we send out. Thank you for sharing your hard work!
We are currently accepting new work for the 2006 Online and Catalog Galleries. If you are interested in submitting work,
click here for detailed instructions and thanks in advance.
-Alex, Catherine, and Brandon
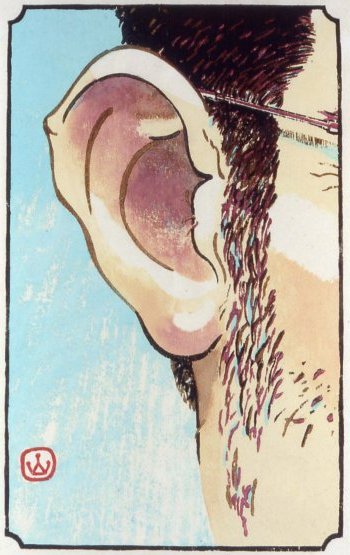
The Artist's Ear
8" x 5 " Japanese Style Woodcut
Michael Lorden
Seattle, WA

Hanalei Bay, Kauai
Japanese Style Woodcut
12" x 16.5
Tom Killion
|

Fuji-San
8.5" x 7.5" Japanese Style Woodcut
Frank Trueba
Scotts Valley, CA

Squid Series V
14" x 12" Woodcut with stencils
Annie Silverman
Somerville, MA

Enchanting the Little People
7.25" x 11.25" Woodcut
Jason Moore
Iowa City, IA
|
_________________________________________________________________________
TIPS_________________________________________________________________
Kento Registration
Kento is the registration system traditionally used by Japanese printmakers.
Multi-color woodblock prints often require a separate block for each color, and the kento marks insure the needed accuracy to align the colors on the paper. It is necessary for each block with a design on it to have its own set of carved kento marks. Here's how to do it!
|
Step 1:
Draw kento lines and image onto the block at the same time. They should be at least ¼ inch in from the edges of the block. Illustration #1
Carve the images on the blocks, then carve all of the kento marks at the same time so they will be consistent. |
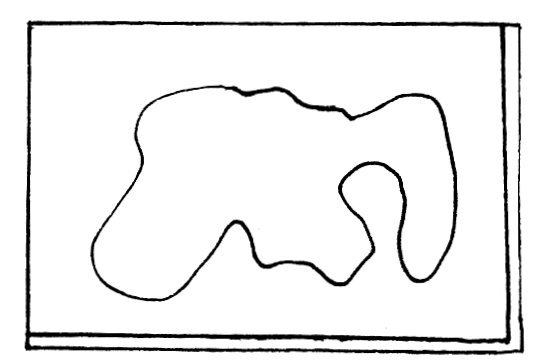
Illus. 1. Draw image and lines. |
| The kento system includes two parts, the hikitsuke kento (line stop) and kagi kento (key). The kagi kento is generally located in the right lower hand corner of the block. The hikitsuke kento is approximately ¾ the distance down the block from the kagi kento. Illustration #2 |

Illus.2. hikitsuke paper kagi |
Step 2:
Start with the hikitsuke kento. Place the kento nomi (registration carving chisel) or hira to (chisel) on the drawn line. Hold the tool with the flat side towards you and push straight down into the wood about 2mm. Gently rock the tool left and right. Illustration #3 |
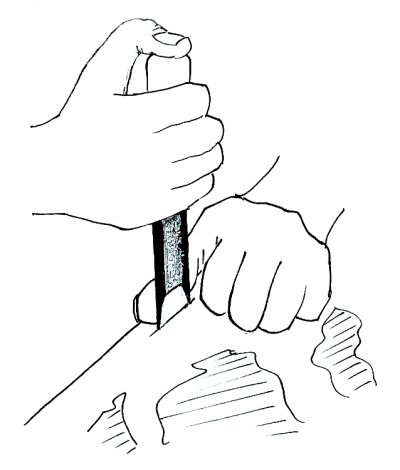
Illus.3. Cut 1 of the hikitsuke kento. |
Step #3:
At both ends of this cut line make perpendicular cuts straight down forming a small rectangle. Illustration #4 |

Illus.
4. Cuts
2 & 3 of the hikistuke kento. |
Step 4:
Turn the block 180 degrees. Make sure the block is secure against a bench hook.
With the bevel side of the kento nomi face down, carefully clear wood way from both sides of the rectangle. Illustration #5 |
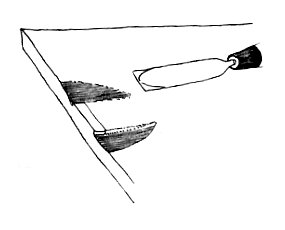
Illus. 5. Clearing the sides of the
hikitsuke kento. |
Step
5:
Shave the area in front of the rectangle to establish a stop for your printing paper. This very shallow cut only needs to be as deep as the printing paper is thick. Illustration #6 |
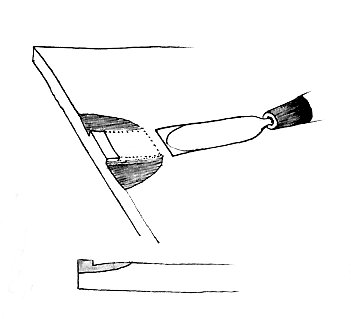
Illus. 6. Cut 6 and side view of the
hikitsuke kento. |
Step
6:
Cut the lines shown in illustration #7 for the kagi kento using the same technique shown in illustration #3. |

Illus. 7. The first 4 cuts of the kagi kento. |
Step
7:
Cut away the areas shown in illustration #8. Clearing these two areas first make the cutting of the corner much easier. |
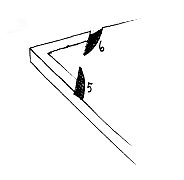
Illus.
8. Cuts 5 & 6 of the kagi kento. |
Step
8:
Now hold the tool almost flat to the wood and shave the wood out of the corner. Illustration #9 |
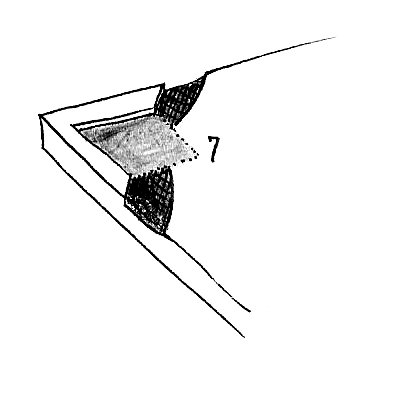
Illus. 9. Clearing the corner of the
kagi kento. |
Step
9:
Clear a 'moat' between the kagi kento and the color area. Illustration #10 |
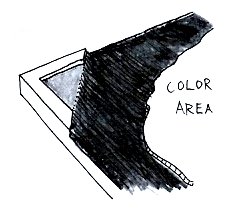
Illus. 10. Clearing the 'moat' between
the design and the kagi kento. |
The kento system is now ready to use! The next step is to print the design. This topic will be covered in further issues of the newsletter. If you have questions about this technique or others related to relief printmaking, give us a call and we'll be happy to help you.
|
|
|
_________________________________________________________________________
PRODUCTS______________________________________________________
Kento Nomi
Registration chisel
Register your blocks like a pro! This beautifully handcrafted tool is designed specifically for making the kento marks talked about in the TIPS section above. Its blade is crafted of the highest quality steel, while the handle is made of Japanese oak, the strongest and most durable wood growing in Japan. The blade is 15mm wide while the tools length is approximately 6 inches long (16.7 cm).
C2056 Kento nomi $58.30
Hira To
Large chisels
While they are designed for clearing large white space areas, Hira To 12mm or larger can also be used to create kento marks. The flat side of the blade facilitates the clean cuts necessary for precise registration marks.
C2827 Namisei 12.0mm $18.55
C2828 Namisei 15.0mm $21.65
C2721 Josei 15.0mm $30.80
C2722 Josei 18.0mm $37.70
C2723 Josei 21.0mm $49.55
C2724 Josei 24.0mm $58.50 |

kento nomi (registration chisel) |
 |
 |
| Disk Baren (hand held press) |
Ategami (backing paper) |
Disk Baren & Ategami
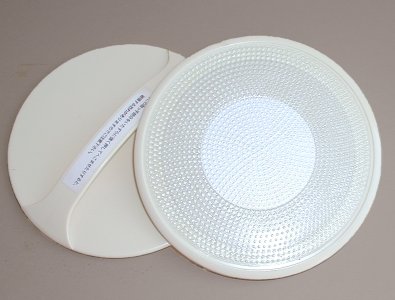
This high tech plastic baren was designed by the famous Japanese Relief Printmaker, Akira Kurosaki. The replaceable disc has tiny bumps on the surface that apply pressure evenly across the paper as you print. Unlike other substitutes for traditional baren, the dimpled face of the Disk Baren is hard and slightly convex so pulling prints takes less time and effort. When these bumps wear down after extended use, you can simply remove the old disc and press on a new one. And for those who dread the thought of replacing a bamboo takenokawa (bamboo sheath), this baren doesn't have one!
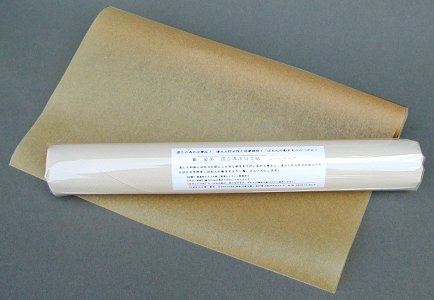
The Baren comes with instructions and a sample of camellia oil, which is applied to the face of the baren so it will glide easily across the paper. We recommend using ategami (backing paper), which acts as a barrier between the baren and your print paper to keep it clean and free of tears.
Disk Baren
A6035 $35.95
Replacement Disk
A6035R $11.50
Ategami
A6550 11.75 in x 32 ft (full roll) $30.00
A6551 11.75 in x 16 ft (half roll) $16.00
A6550 11.75 in x 8 ft (quarter roll) $9.00 |
|
|
__________________________________________________________________________________________
|

